
I’ve built a handful of single page javascript applications with Leaflet recently and wanted to make it easier to quickly spin one up, and to make Leaflet-based applications more accessible to those with no exposure to the (constantly changing) Javascript build manager ecosystem so I created a skeleton app: https://github.com/ngottlieb/brunch-leaflet-es6-skeleton. The README should be pretty self-explanatory, but I’ll go through an example workflow here. The full code for the example is here: https://github.com/ngottlieb/brunch-leaflet-tutorial.
Setup Your Project
If you haven’t used NodeJS before, you’ll need to install it. On a Mac, you can do this with Homebrew or with a package from the Node website. Install Brunch with sudo npm install -g brunch. Now you’re ready to use the skeleton I built:
brunch new brunch-leaflet-tutorial -s ngottlieb/brunch-leaflet-es6-skeleton
Great! Once it finishes installing packages, you can give it a run with npm start. Congratulations, you have a running LeafletJS app — go check it out at http://localhost:3333.
Adding Data
OK, so now you have a Javascript app displaying a Leaflet map with a “Hello World” marker on it. Not super useful. Leaflet supports a number of different ways of adding data, but the most convenient — from a geospatial science perspective — is GeoJSON. You may have your own interesting GeoJSON to map; for the purposes of this tutorial, I’m using a dataset from the US Census showing Native American territories that I found in GeoJSON format here.
You have a few options when it comes to incorporating your GeoJSON data:
- embed it directly in your Javascript code either in
map.jsor another file, assigning it to a variable that Leaflet can read from - incorporate it from a public third-party location (or a local JSON file) using leaflet-ajax
Depending on the size of your dataset, option one is often fine, but if you have a publicly available JSON file than that’s most likely the best route to go.
To install the leaflet-ajax library and save it as an app requirement, run npm install --save leaflet-ajax. In order to take advantage of its functionality, add:
require("leaflet-ajax");
to the top of map.js and then call the L.GeoJSON.AJAX method to load the data.
Here’s our modified map.js loading the dataset from Github using leaflet-ajax:
https://gist.github.com/ngottlieb/22b12b4f83b1e329dfb177034665f505/0cb2867efcab0279909b846d68d03fe9ec073cb7
Open it up in the browser and — sweet! — we’ve got a map of the USA displaying a GeoJSON dataset. That was easy.
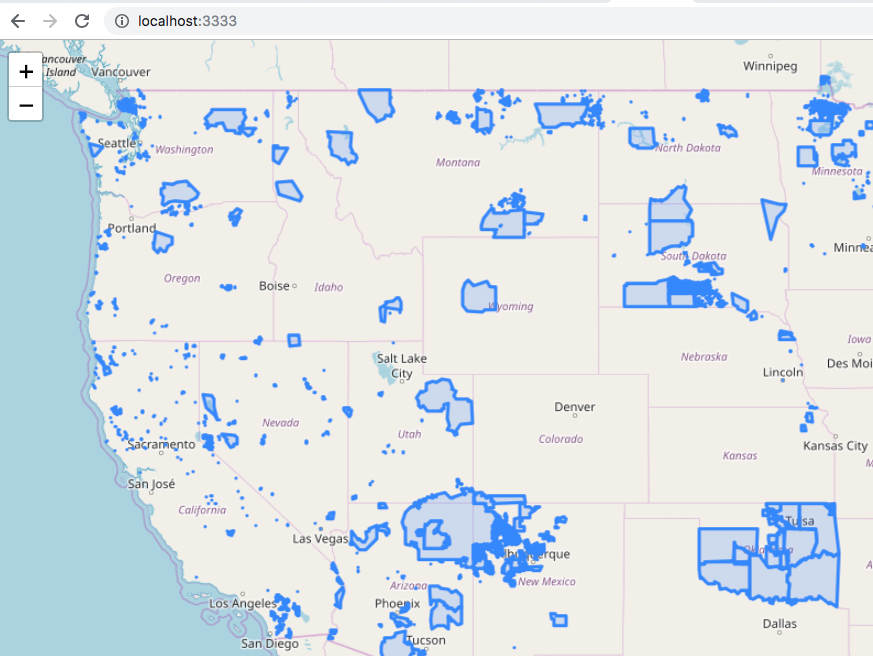
Displaying Properties
Alright, initial shock wearing off — this map isn’t that useful without any information about what it is. This particular dataset comes with a few properties; the most valuable is “NAME.” We want users to be able to click on a shape and find out what it represents, so we need to add some popups to our features. Additionally, a number of the features are also multi-polygons — meaning, they have separate regions that belong to the same unit — so we need to make that clear somehow.
Leaflet provides a lot of convenient ways to work with GeoJSON and their documentation shows us how to solve both those problems. We use the onEachFeature argument to define a callback that adds a popup to each feature and the style argument to define separate styles for each feature in the GeoJSON:
https://gist.github.com/ngottlieb/22b12b4f83b1e329dfb177034665f505/2f1528220ec1e9cb4772266d20e26a71b9a6d9e6
Huzzah!

Publishing Your App
So — we’ve got a usable map on our local machine. How do we share it? The beauty of this setup is that Brunch can compile your application into static HTML and Javascript which can be opened by anyone. To build a “production” version of your application, just call npm run build. This compiles your application into Javascript, HTML, and CSS inside the public/ directory. You can try opening public/index.html in your browser — you should see your map. You can share the contents of that folder with anyone and they’ll be able to view your map.
In the real world, we usually want to publish these kinds of things on the internet. For open source projects, Github Pages is a really convenient way of sharing single-page applications. To publish your app to Github pages, follow these steps:
- Create a new repository on Github: https://github.com/new
- Add the new repository as a remote: `git remote add origin git@github.com:your-name/brunch-leaflet-tutorial`
- Build your application into the
public/folder:npm run build - Temporarily move the compiled application outside the working tree:
mv public ../ - Create a
gh-pagesbranch:git checkout -b gh-pages - Remove all files from your repository:
rm -rf * - Move the compiled application back into the working tree:
mv ../public/* . - Commit the changes to the
gh-pagesbranch:git add . &&git commit -m 'add compiled app for gh-pages release' - Push your branch to Github:
git push origin gh-pages - Enable Github pages in your repository settings: https://github.com/your-name/brunch-leaflet-tutorial/settings (note: Github seems to automatically do this when you push the
gh-pagesbranch)
Give Github a couple minutes to catch up and your application should now be visible at https://your-name.github.com/brunch-leaflet-tutorial!
Leave a Reply